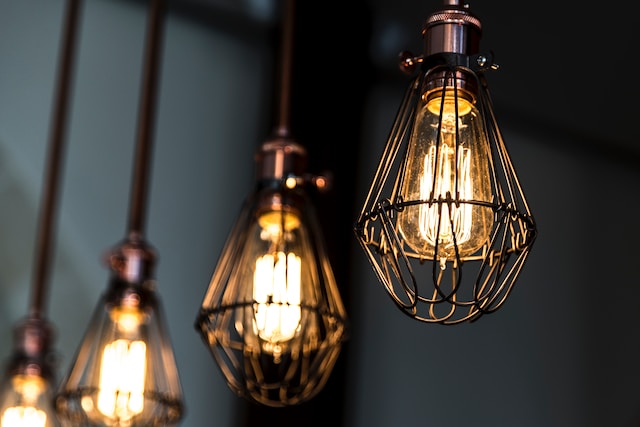
Create personalized pendant lights with our easy DIY guide. Illuminate your space with handcrafted fixtures. Get inspired now! Pendant lights have the incredible ability to not only illuminate a space but also add a touch of character and style. While there are numerous options available in the market, crafting your own pendant light fixtures through DIY projects offers a unique opportunity to infuse your personal creativity and design preferences. With a few basic materials, a dash of inspiration, and easy-to-follow steps, you can create handcrafted pendant lights that become stunning focal points in your home. Let’s delve into the world of DIY pendant lights and discover how you can craft fixtures that reflect your individuality.
Why Choose DIY Pendant Lights?
DIY pendant lights offer a multitude of benefits beyond their aesthetic appeal. Here are some reasons why you might consider creating your own handcrafted fixtures:
- Personalization: DIY projects allow you to tailor the design, materials, and colors to match your specific decor theme and preferences.
- Cost-Effective: Handcrafting pendant lights can often be more budget-friendly than purchasing ready-made designer fixtures.
- Creativity Unleashed: Designing your own pendant lights sparks your creative instincts, allowing you to experiment with different materials, shapes, and styles.
- Satisfaction of Creation: There’s a sense of accomplishment and pride in crafting something with your own hands, especially when it contributes to your home’s ambiance.
- Unique Decor Elements: DIY pendant lights become conversation pieces, adding unique and intriguing elements to your home’s interior.
Getting Started: Materials and Tools
Before you embark on your DIY pendant light journey, gather the necessary materials and tools. Here’s a basic list to get you started:
Materials:
– Pendant light kit (includes socket, cord, and canopy)
– Lightbulb(s)
– Wire connectors
– Ceiling hooks
– Shades, beads, or decorative elements (if desired)
Tools:
– Screwdriver
– Pliers
– Wire stripper/cutter
– Electrical tape
– Paint or decorative materials (if customizing shades)
– Scissors
– Measuring tape
Step-by-Step Guide to Crafting Pendant Lights:
Step 1: Choose a Design and Gather Inspiration
Start by determining the style and design of your pendant lights. Browse interior design magazines, websites, and social media platforms for inspiration. Whether you’re drawn to minimalist, industrial, bohemian, or vintage styles, gathering ideas will help you envision the final product.
Step 2: Plan and Prepare
Once you have a design in mind, plan the materials and components you’ll need. Purchase a pendant light kit that includes sockets, cords, and canopies. Decide on the number of pendant lights you want to create and ensure you have enough kits for each.
Step 3: Customize Shades (Optional)
If your design includes shades, this is your opportunity to get creative. Consider using paint, fabric, or other decorative materials to customize the shades and match them to your decor theme. This step adds a personalized touch to your fixtures.
Step 4: Assemble Pendant Light Kits
Follow the manufacturer’s instructions provided with the pendant light kits to assemble the components. This typically involves attaching the socket, cord, and canopy. Be sure to use wire connectors and follow proper wiring techniques to ensure safety and functionality.
Step 5: Wiring and Installation
Before working with electricity, make sure the power is turned off at the circuit breaker. Carefully strip the wire ends and connect them according to the manufacturer’s instructions. Secure the wires with wire connectors and cover the connections with electrical tape. Once the wiring is complete, test the light to ensure it functions properly.
Step 6: Mount Ceiling Hooks
Determine the placement of your pendant lights and mark the spots on the ceiling. Install ceiling hooks in these locations to hang the pendant lights. Make sure the hooks are securely attached and can support the weight of the fixtures.
Step 7: Assemble and Hang
Attach the shades (if applicable) to the sockets and screw in the lightbulbs. With the pendant light fully assembled, hang it on the ceiling hooks. Adjust the height and positioning to ensure the lights are well-distributed and visually appealing.
Step 8: Test and Adjust
Before finalizing the installation, turn on the pendant lights to make sure they illuminate as expected. Adjust the height and angles if necessary to achieve the desired lighting effect and ambiance.
Step 9: Secure and Finish
Once you’re satisfied with the setup, secure any loose components and make sure the pendant lights are stable and safe. Double-check the wiring connections and ensure all elements are properly fastened.
Step 10: Enjoy Your Handcrafted Lights
Turn on your newly created pendant lights and relish in the warm and inviting glow they emit. Take a moment to appreciate the beauty of the fixtures you’ve crafted with your own hands.
Tips for a Successful DIY Pendant Light Project:
1. Safety First:
Always prioritize safety. Work with electricity only if you’re comfortable and confident in your abilities. If not, consider seeking assistance from a professional electrician.
2. Measure Twice:
Accurate measurements are crucial for a balanced and visually pleasing arrangement. Measure the height, spacing, and placement of your pendant lights carefully.
3. Experiment with Materials:
Don’t be afraid to experiment with different materials and colors. Mix and match shades, beads, or other decorative elements to achieve the desired look.
4. Test the Wiring:
Before hanging the pendant lights, test the wiring and lightbulbs to ensure they function properly. This avoids any complications after the installation.
5. Customize Shades:
If you’re customizing shades, allow ample time for paint or decorative elements to dry before attaching them to the pendant light fixtures.
6. Balance and Symmetry:
If creating multiple pendant lights, aim for balance and symmetry in their arrangement to achieve a harmonious overall look.
7. Maintenance Considerations:
Keep in mind that DIY pendant lights might require occasional maintenance, such as cleaning the shades or tightening any loose components.
Final Thoughts
DIY pendant lights offer a delightful blend of creativity, functionality, and personalization. By following easy-to-follow steps and embracing your artistic flair, you can craft pendant light fixtures that not only illuminate your space but also become captivating pieces of decor. From choosing designs and assembling components to testing wiring and installation, each step contributes to the rewarding experience of creating something unique for your home. So, unleash your inner artist, explore the world of DIY pendant lights, and bask in the warm glow of your handcrafted fixtures that illuminate both your space and your creative spirit.