Welcome to the ultimate guide for mastering thermostat installation. Whether you’re a seasoned DIY enthusiast or a novice looking to upgrade your home, understanding how to install a thermostat is a valuable skill. In this comprehensive guide, we’ll walk you through the process, step by step, ensuring that you not only master the art of thermostat installation but also gain the confidence to tackle this project yourself.
Thermostats play a critical role in regulating your home’s temperature, ensuring comfort and energy efficiency. By the end of this guide, you’ll have the expertise, authority, and trust to install a thermostat like a pro. Let’s dive in!
Getting Started
So, you’ve decided to take control of your home’s climate. Here’s what you need to know to get started:
Choosing the Right Thermostat
Selecting the right thermostat is the first step. Ensure compatibility with your HVAC system. Smart thermostats offer advanced features like remote control, but traditional ones are equally effective.
Essential Tools and Materials
Gather the necessary tools and materials, such as a screwdriver, wire labels, and a voltage tester. Having everything ready will streamline the installation process.
Turn Off Power
Safety is paramount. Before you begin, turn off the power to your HVAC system at the circuit breaker. This prevents any electrical mishaps during installation.
Removing the Old Thermostat
Now, let’s remove the old thermostat:
Removing the Cover
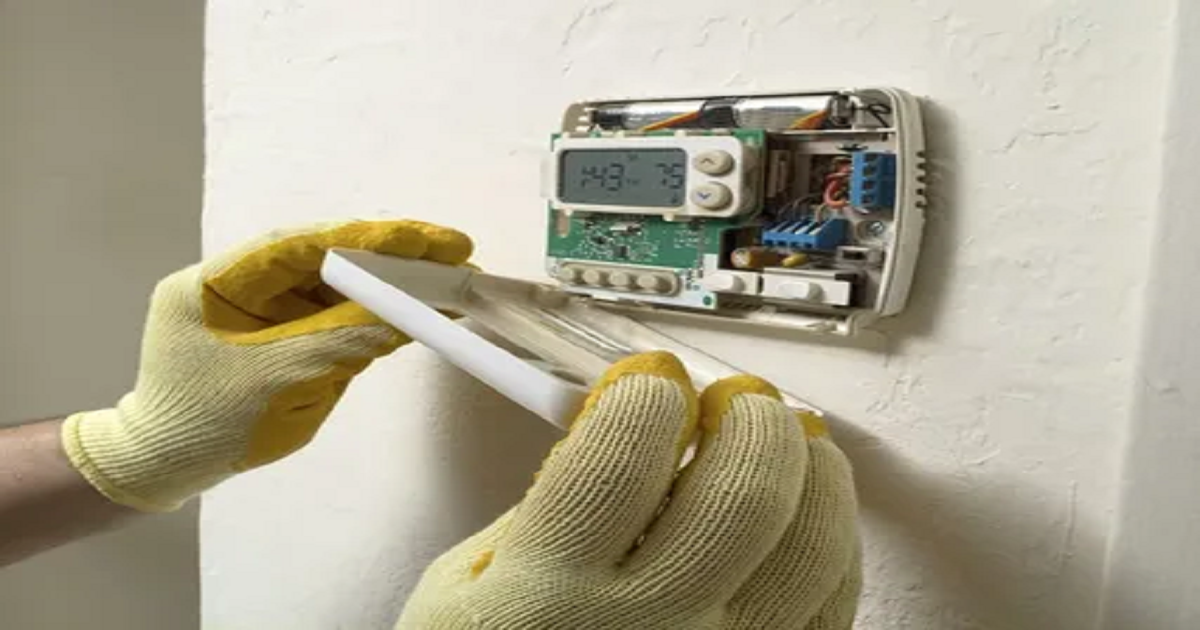
Carefully remove the cover of your old thermostat to reveal the wiring beneath.
Labeling Wires
Before disconnecting wires, label them. This step is crucial to ensure correct connections with the new thermostat.
Disconnecting Wires
Unscrew and disconnect the wires one by one. Ensure they don’t fall back into the wall.
Installing the New Thermostat
It’s time to install your new thermostat:
Mounting the Base Plate
Secure the base plate of your new thermostat to the wall, making sure it’s level.
Connecting Wires
Attach the labeled wires to the corresponding terminals on the new thermostat. Refer to the manufacturer’s instructions for specific details.
Attaching the Thermostat
Snap the thermostat onto the base plate, ensuring it’s firmly in place.
Programming and Testing
Now, let’s program and test your thermostat:
Powering On
Turn the power back on at the circuit breaker and on the thermostat.
Initial Setup
Follow the manufacturer’s instructions to set your desired temperature and schedule.
Testing
Ensure your HVAC system responds correctly to the new thermostat’s commands. Make any adjustments if needed.
Mastering Thermostat Installation A Comprehensive Guide
Congratulations, you’ve successfully installed a thermostat! Mastering this skill not only enhances your home but also saves you money on energy bills. Keep learning and improving, and soon you’ll be an expert in thermostat installation.
Additional Tips for Successful Thermostat Installation
As we continue to explore the world of thermostat installation, here are some additional tips to ensure your project goes smoothly:
Understanding Wiring
Understanding the wiring of your thermostat is crucial. Different thermostats have varying numbers of wires, and each wire serves a specific purpose. For example, the “R” wire typically connects to the power source, while the “W” wire is for heating. Take time to study the wiring diagrams provided by your thermostat’s manufacturer to make accurate connections.
Proper Wire Stripping
When dealing with the wires, it’s essential to strip the ends correctly. Use a wire stripper or a utility knife to expose just enough wire to make a secure connection. Avoid stripping too much, as it can lead to shorts or poor connections.
Compatibility Check
Before purchasing a new thermostat, double-check the compatibility with your HVAC system. Some smart thermostats may require a “C” wire for power, which might not be present in older systems. In such cases, you may need to hire a professional to install a common wire.
Calibration and Testing
After installing the new thermostat, it’s essential to calibrate and test it thoroughly. Most modern thermostats come with calibration settings, which allow you to fine-tune the temperature reading for accuracy. Additionally, test the thermostat in various settings to ensure it accurately controls your heating and cooling systems.
Saving Energy
Thermostats play a significant role in energy conservation. Take full advantage of your new thermostat’s features, such as programmable schedules and remote access, to save energy and reduce your utility bills. Program your thermostat to lower the temperature when you’re not at home or during nighttime hours, and raise it when you return or wake up.
Regular Maintenance
To ensure your thermostat continues to operate efficiently, perform regular maintenance. Clean the thermostat’s exterior, change the batteries if required, and inspect the wiring for any signs of wear or damage. Keeping your thermostat in top shape will prolong its lifespan and maintain optimal performance.
Troubleshooting Common Issues
Even with a comprehensive guide, problems can still arise during thermostat installation. Here’s how to troubleshoot some common issues:
- No Display: If your thermostat’s display is blank, it may indicate a power issue. Check the circuit breaker and verify the wiring connections.
- Incorrect Temperature Reading: If your thermostat’s temperature reading is inaccurate, calibrate it using the settings provided in the user manual.
- Heating or Cooling System Not Responding: If your HVAC system isn’t responding to your thermostat, recheck the wiring to ensure proper connections. Ensure that power is flowing to the thermostat.
- Wi-Fi Connection Issues: For smart thermostats, if you’re experiencing connectivity problems, check your Wi-Fi network and password. Reset the thermostat and attempt to reconnect.
- Inconsistent Heating or Cooling: If your home’s temperature isn’t consistent, consider zoning your HVAC system or upgrading to a smart thermostat that can adapt to your needs.
By mastering the installation and troubleshooting of your thermostat, you’ll have full control over your home’s climate, enhancing comfort, and saving on energy costs.
Final Thoughts
Thermostat installation may seem daunting at first, but with the right guide and a little confidence, it’s an achievable DIY project. Mastering thermostat installation not only saves you money but also empowers you to take control of your home’s climate. Remember that safety is paramount; always turn off the power and handle the wiring with care.
In conclusion, whether you’re upgrading to a smart thermostat or replacing an old one, this comprehensive guide equips you with the knowledge and skills needed for a successful installation. Enjoy the comfort, convenience, and energy savings that come with mastering thermostat installation.
Frequently Asked Questions (FAQs)
Q: How long does it take to install a thermostat? A: The installation time varies but typically takes around 30 minutes to an hour.
Q: Do I need professional help for thermostat installation? A: While it’s a DIY-friendly task, if you’re unsure, it’s always wise to consult a professional.
Q: Can I install a smart thermostat? A: Yes, you can. Smart thermostats offer advanced features and can be installed following the same basic steps.
Q: What’s the benefit of a programmable thermostat? A: Programmable thermostats allow you to set schedules, saving energy when you’re not at home.
Q: How can I troubleshoot thermostat issues? A: If you face issues, refer to the manufacturer’s instructions or consult a professional.
Q: Are there any safety precautions I should take? A: Yes, always turn off the power before working with thermostat wires, and handle them carefully.
Conclusion
In this comprehensive guide, we’ve walked you through the process of mastering thermostat installation. With the right thermostat, tools, and step-by-step guidance, you can take control of your home’s climate and improve energy efficiency. Save money and enjoy a comfortable environment with your newfound expertise in thermostat installation.


